
How to Repair Your Wetsuit?
Whether you are a dedicated triathlete, surfer, or diver, you naturally want to keep your wetsuit in top condition. Proper maintenance extends the lifespan of your wetsuit and ensures you stay comfortable and warm in the water. Of course, you want to avoid damage to your wetsuit, but sometimes accidents happen, resulting in tears. You might catch it on the edge of a pier or pull too hard, causing a small rip in the neoprene with your nails. Fortunately, most (small) repairs are easy to do at home. In this guide, we will show you how to perform various repairs yourself so that you can get back in the water with a fully functional wetsuit.
In this guide on repairing your wetsuit:
- Tools needed to repair a wetsuit
- Different types of damage
- How to repair a small tear?
3.1 Preparation for small repairs
3.2 Cleaning the damaged area
3.3 Gluing
3.4 Opening the damage
3.5 Joining the material - How to repair a small hole? (< 2cm)
4.1 Preparation for small repairs
4.2 Cleaning the damaged area
4.3 Gluing the hole - Wetsuit repair
- Some maintenance tips for your wetsuit
Tools Needed to Repair a Wetsuit
To repair damage to your wetsuit, you will need a number of materials and small tools. A good wetsuit repair kit is essential; quality kits almost always include high-quality neoprene glue, a brush (to apply the glue), and various neoprene patches and strips (tape).
For small repairs, the following is sufficient:
- Neoprene glue
- Neoprene patches (discs) or neoprene strips
- Brush or small applicator
- Scissors
For larger repairs, it is best to take your wetsuit to a professional repair specialist. This blog focuses only on small tears and holes (< 2cm), as larger damages cannot be repaired at home and require a wetsuit repair specialist.

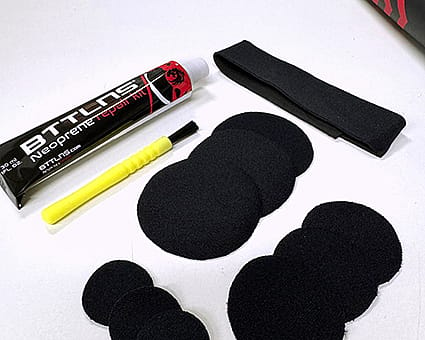
The wetsuit repair kit that we recommend, and also use ourselves, for repairs is the BTTLNS wetsuit repair kit.
Different Types of Damage
Below is an overview of the three different types of damage so that after assessing them, you can continue reading at point 1, 2, or 3.
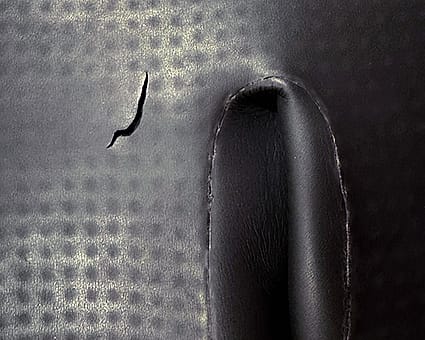
- Small tears / cuts that do not go completely through the material. In this case, the rubber is partially or fully torn, but the inside (fabric) is not damaged. You can see the tear / cut on the outside but not on the inside. These tears are no larger than 2cm.
- Small holes or tears that go completely through the material. Here, the tear or hole in any form goes completely through the material. You can look through the hole and the damage is also visible on the inside of your wetsuit. These tears / holes are no larger than 2cm.
- Tears larger than 2cm, split seams, spots where the material is completely missing, etc. Unfortunately, these cannot be repaired at home.
Small tears / cuts (not through the neoprene, < 2cm)
These can be tears that do not go completely through the wetsuit (often only the material is torn, but the inside / fabric is not damaged). This can occur from pulling on a dock or accidentally digging your nails into the neoprene. These include small tears and / or cuts up to a maximum of 2cm.
Large Tears / Holes +2cm
Large tears or holes can occur if you, for example, get caught on something, or if you pull too hard while putting on or taking off your wetsuit causing a seam to split completely. Think of tears larger than 2cm.
3. How to Repair a Small Cut?
Small cuts (e.g., caused by your nails) can fortunately be repaired easily and quickly at home using the right wetsuit repair kit and proper technique.
Preparation for Small Repairs
Make sure you have the right materials ready; for small holes, you only need neoprene glue and a small brush.
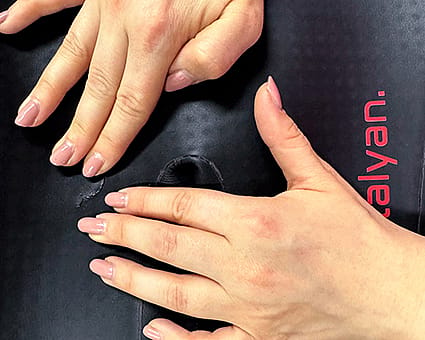
3.1 Cleaning the Damaged Area
To ensure your repair goes smoothly and you can get back in the water quickly, first clean the damaged area thoroughly. Use clean tap water to rinse away dirt, sand, and salt.
Then let the area dry completely.
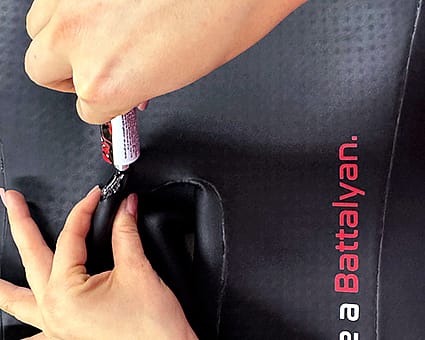
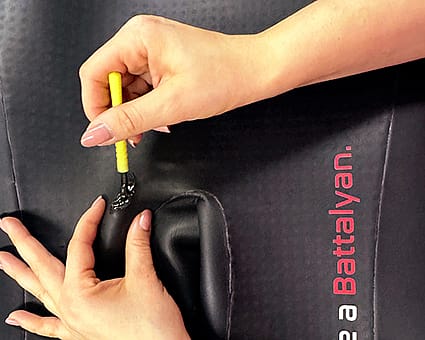
3.2 Applying the Glue
Once the damaged area is clean and dry, you can apply the neoprene glue.
3.3 Opening the Damage
Gently open the damaged area and apply the neoprene glue to both sides of the tear. Apply enough glue so that the tear is completely filled. Wait about 2–3 minutes until the glue dries and becomes slightly tacky.
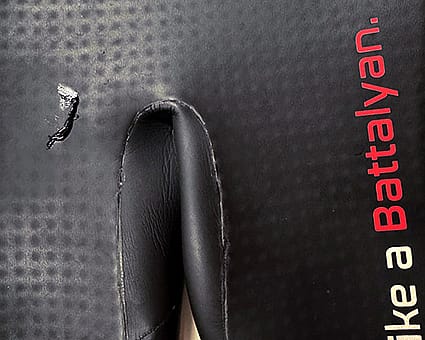
3.4 Joining the Material
After 2–3 minutes have passed, press the material firmly together. Make sure to align the material neatly so that the tear is flat and "invisible" (if you press it crooked, it will remain visible). Hold it firmly with your fingers for at least 10 minutes. Eventually, the material should be pressed together for about 1 hour. You can use a bulldog clip (binder clip) for this (otherwise it can be a long wait). Then let it dry for 24 hours before using your wetsuit again.

4 How to Repair a Small Hole? (through the material, holes <2cm)
In addition to a small cut, you may also find a hole in your wetsuit. Don’t worry, you can easily repair this yourself as well. By “hole” we mean that it goes completely through the material, including both the neoprene and the fabric on the inside. Let’s go through the steps together:
4.1 Preparation for Small Repairs
For this type of repair, you will also need a wetsuit repair kit. For a small hole, you will need, in addition to neoprene glue and a small brush, a patch (neoprene disc or strip) to seal the hole.
4.2 Cleaning the Damaged Area
As with small cuts, it is important to first clean the damaged area thoroughly so that dirt such as sand and salt is removed. You can simply use clean tap water for this.
After rinsing the area, let it dry completely.
4.3 Sealing the Hole
Once the area is clean and dry, we can start the repair.
Step 1: Gently open the hole and apply neoprene glue to the edges of the hole. Allow the glue to dry.
Step 2: Apply another thin layer of neoprene glue, wait until it becomes slightly tacky, and gently press the edges of the hole together to close it. Let it dry for approximately 30 minutes.
Step 3: To make the area completely watertight, apply a neoprene patch (disc). This also strengthens the repair. Measure the damaged area to determine the correct size neoprene disc. The repair kit contains both small and large discs. Note: attach the neoprene disc to the inside of the wetsuit, not the outside! Place a disc over the area and mark a circle around it with, for example, chalk so you know exactly where to place it.
Apply a thin layer of neoprene glue to the inside so the hole is sealed from the inner side as well. Let the glue dry for about 5 hours.
Once the inner glue is dry, attach the neoprene disc to the inside. Apply a thin layer of glue inside the white circle you previously marked. Wait 2–3 minutes until the glue becomes slightly tacky.
Then apply glue to the neoprene disc itself. Apply enough glue, but not too much, to prevent it from oozing out from the edges. Wait until it becomes slightly tacky and then place the disc on the marked spot.
Ensure pressure is applied so the disc and wetsuit adhere firmly together. You can place weights or heavy books on top. Allow it to cure for at least 1 hour. Let the glue dry for at least 24 hours before going into the water.
If it is a tear (<2cm), you can follow the same steps but use the strip from the repair kit instead of a disc.
We recommend cutting the strip slightly longer than the length of the tear. For a round hole, choose a disc considerably larger than the hole.
Wetsuit Repair
If the damage is too extensive to repair yourself, your wetsuit should be taken to a wetsuit repair center where specialist technicians work. They can often stitch the tear or insert a new piece of neoprene. This ensures that larger damages are properly repaired, allowing you to fully enjoy your wetsuit again. If necessary, we recommend contacting a repair center yourself. They can properly assess your wetsuit and provide an accurate price estimate. A rough estimate for small tears is usually between €40–80, and for larger repairs between €80–150 (e.g., zipper replacement or full panel replacement).
If you are unsure whether you can repair the damage yourself, you can always send a non-binding email to our customer service so we can assess it. For 100% certainty, it’s best to visit our store in Volkel so we can inspect and evaluate it in person.
Some Maintenance Tips for Your Wetsuit
- Always rinse your wetsuit with fresh water after use.
- Dry your wetsuit inside out on a wide wetsuit hanger and out of direct sunlight.
- Avoid contact with sharp objects.
- Check regularly for small tears and repair them immediately.
Is Your Wetsuit Beyond Repair?
If your wetsuit is so damaged that it cannot be repaired and you still want to keep swimming, it’s time for a new wetsuit. Not sure yet which wetsuit best suits your needs and preferences? We are happy to help with all your questions to find the perfect choice. You can reach our wetsuit specialists via +31(0)413-256800 or send an email. You can also visit our store in Volkel, Netherlands.